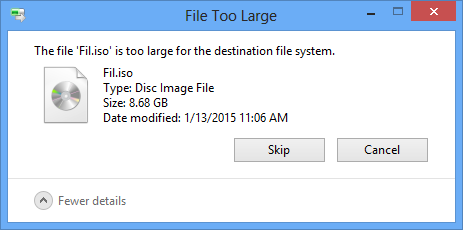
This post introduces causes and solutions to error “File is too large for the destination file system”. This file size too large error may occur when you copy a very large file to a USB disk even though the disk has enough free space. If you are confused by this error, you can follow methods in this guide to fix it.
Error description of “File is too large for the destination file system”
As Windows user you will definitely encounter an error message while copying any single large file (exceed 4GB) to removable storage device like SD card, pen drive, USB flash drive, external hard drive, etc. The error appears on “File Too Large” message box saying “The file <file name> is too large for the destination file system.” with detailed information about the file being transferred.
Here is one of the questions asked on forum:
“Hey All! I was trying to move a few movies and videos from my laptop to my WD Passport (500GB). The biggest file is 4.7GB and the total size of them is about 20GB and the external drive still has 180GB free space. I thought there won’t be problem storing these files. But it still says file too large for USB. I don’t understand why it is too big. Don’t know what to do and I’m kind of need to get this done. Please!”
Reasons behind “file too large for destination file system”
If you run into such problem, you should check the file system for the target disk which must have been formatted to FAT32 file system. This file system type has a built-in limitation on per file size it can access. Although the total file size you can copy to a FAT32 partition can be 2TB at most, per file size shouldn’t be larger than 4GB.
FAT32 was introduced by Microsoft during the days of Windows 95 when such large files were unthinkable or designers believed it would be replaced by more advanced file system. How to eliminate the limitation and copy 4GB files? You need to convert file system from FAT32 to NTFS or exFAT. Both NTFS and exFAT are able to copy a file larger than 4GB.
Which one to choose, NTFS or exFAT?
Both NTFS and exFAT are robust file system, but which one is better depends on the storage device you use.
NTFS (New Technology File System) is mainly used on hard drive and external hard drive. It is compatible with all Windows versions from Windows NT to Windows 10, and it provides features not supported by FAT32 such as file security, encryption, compress, etc.
NTFS is also read-supported by Mac OX. exFAT has good compatibility on many flash drives or memory cards which might be used under Android phones, tablets, digital cameras.
Besides, it is read and write supported by recent versions of Mac OS. If you want to use your external disk on both Windows and Mac platform, you can format it into exFAT.
Solutions to “File is too large for the destination file system” issue
Method 1: Compress file
This is an easy but limited method to circumvent this 4GB file limitation. You can use compression software installed on your computer to compress the file into a smaller one. If file becomes smaller than 4 GB after compression, then problem solved. Compressed files occupy less disk space and can be moved more quickly.
Method 2: Format disk into exFAT or NTFS file system
Important: Formatting deletes all data from the partition, if it contains important data, you should back up files before trying following steps.
If USB drive loses data, you can use free data recovery software to do USB drive recovery and get back deleted or lost files easily.
Here are steps to format a USB disk to exFAT or NTFS in Windows:
Step 1. Attach the USB disk to computer and wait for system to recognize it and assign a drive
Steo 2. Double Computer icon to open it and location drive letter for the USB disk that you want to change file system format.
Step 3. Before formatting, you need to open this drive and check whether there are important files. If this disk can’t be opened and reports errors such as “Please insert a disk into removable disk”, you should use recovery software to retrieve data.
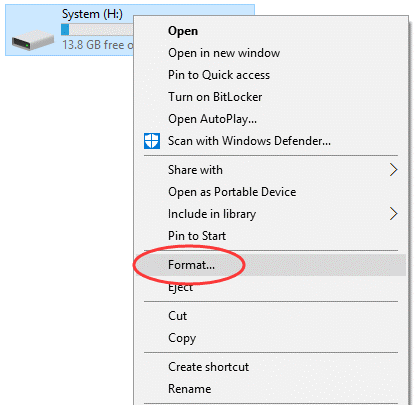
Step 4. Right click the USB drive and select “Format” from the menu.

Step 5. Select NTFS or exFAT from the drop-down list of the File system section.
The default file system might be FAT32, thus you should set it manually. Apart from that, the “Quick Format” option should be select to ensure the formatting can be completed in shortest time. If you can’t find needed file system type from the drop-down list, you can use DiskGenius Free Edition to do the formatting.
Step 6. Click Start button and you’ll get a message box telling formatting will erase all data on this disk.
Step 7. If you have backed up important data, click OK button and formatting will be done in seconds.
Method 3: Convert FAT32 to NTFS file system with Command Prompt
This method can convert FAT to NTFS without deleting existing file, but it is still recommended to create a backup of your files before starting the conversion.
Step 1. Insert USB drive to computer and open Windows Explorer to see its drive letter which is G in this example.
Step 2. Click Start button and type in cmd in the searching box and hit Enter.
Step 3. In Command Prompt type in chkdsk G: /f : and hit enter. Here G is the drive letter of the USB drive you want to convert. It check error for the drive.
Step 4. Enter convert G: /FS:NTFS and press Enter. Make sure you are using correct drive letter, if not replace “G” for the letter of the drive to be converted.
Step 5. The process may take a while, just let it run and finish. When conversion completes, check whether file system is correctly converted and file in order.
