The aim of this article is presenting how to delete a partition (or delete all partitions) from a USB drive in Windows 11, Windows 10, Windows 8, Windows 7, Windows Vista and Windows XP. Deleting partition can be done via various methods and this instruction includes 4 methods of removing partitions on a USB disk.
Overview on removing partitions from a USB drive
Deleting partitions is the process of removing volumes and data, which is one of the most common operations users do to storage device in order to manage or make best of disk capacity. A disk partition is a logical storage area on a hard drive or USB storage devices, and a disk can contain multiple partitions. A new hard drive usually contains a single partition which means you can see the drive in File Explorer after it is installed on computer correctly.
However, users prefer to add more partitions on the disk so that files and operating system can be stored in separate sections without conflicts. Partitions on a disk can be formatted to various file system such as NTFS, FAT32, exFAT, Ext4, etc., so that they can be accessed by different operating systems. Once a partition is created, you can store all kinds of data on it, for example, photos, documents, emails, applications, backups, etc.
Similarly, a USB drive should be partitioned before it can be used to store data. Most of us deem that a USB drive can only be divided into a single partition, but it is not always the story. Actually, both USB flash drives and SD cards can be divided into multiple partitions and these partitions can be managed by a free partition manager. Thus, we can create, delete, format, hide, clone or back up these partitions when necessary. Since a partition is the container of our data, the deletion of a partition definitely leads to data loss. There are still reasons explaining why people want to delete partitions on SD cards, USB drives or hard disks.
Here is one of such issue found on online community:
“Recently I downloaded a program which is able to make bootable disk for flash drive. I tried that software, and it creates two small partitions and leaves 13.87GB unallocated space. Now the disk does not show in File Explorer, but I can see it in Disk Management. I want to revert the flash drive to one single partition as before. However, when I right-click on one of the partition, the option “Delete Volume” is not available. What’s more, other options like Extend, Format are also greyed. What can I do to remove these two partitions? Btw, My computer is running Windows 7.”
The need to delete partitions from USB drives
Although deleting USB partitions brings about data loss issue, there are still many users what to delete volumes from USB disks, SD cards or hard drives. Here are some reasons they do so:
- To delete extra partitions. There is usually a single partition on the USB flash drive or SD card, and extra partitions cannot be accessed and should be deleted.
- To wipe a USB drive. Many users believe deleting partitions can completely wipe the USB drive, and thus they would like to try deleting partitions.
- To remove write-protection. In some cases, the removing of partition can fix the “The disk is write protected” issue occurred on USB drive.
- To repartition the USB drive. Delete all partitions on a USB drive which is not properly partitioned and create new partitions.
- To restore USB drive back to full capacity. If a USB flash drive contains two or more partitions, Windows operating system prior to Windows 10 can access the first partition only. Thus you won’t be able to utilize all capacity. In that case, you’ll want to delete extra partitions to restore USB drive back to full capacity.
- To get rid of virus. Virus or malware will be removed once the partition is deleted.
- To repair damaged partitions. Delete the corrupted partition and create a new one.
Things you need to know before deleting partition
It is important to note that when you delete a partition from USB disk, you’ll lose all information in that partition. Therefore, a full backup of important data should be done before deleting anything. If you failed to back up data, you’ll have to perform USB drive recovery.
Deleting partitions cannot completely wipe data on the USB flash drive, and lost partitions and files are still recoverable. If you want to permanently erase data on USB drives, you can use DiskGenius Free (formerly known as PartitionGuru) to wipe a disk.
There are more than one methods to delete partitions from a USB drive, and you should choose the one that is easier to you. Complicated operations may lead to extra issues, for example, delete wrong partitions.
Method 1: Remove partition on USB drive in Windows 10 Disk Management
Disk Management in Windows 10 improves performance on USB drives, as Windows 10 becomes able to access the second partition on USB disks. The “Delete Volume” is available to delete USB partitions. If your computer haven’t upgraded to Windows 10, you can move to rest methods to delete partitions on USB disks or memory cards.
Step 1: Open Disk Management by right-clicking Start menu and choosing Disk Management.
Step 2: Locate the USB drive and the partition to be deleted. Right-click on it and select “Delete Volume” option from context menu.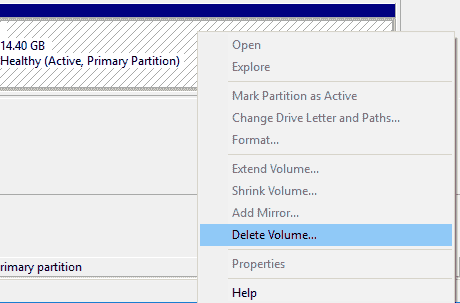
Step 3: System prompts the deletion causes data and asks to backup data in advance. Click “Yes” button if you have created a backup.
Method 2: Delete partition on USB drive via Diskpart command
DiskPart.exe is a text-mode command interpreter that enables you to manage objects (disks, partitions, or volumes) by using scripts or direct input from a command prompt. It is able to create, delete and format partitions. It is recommend that beginner users use this tool cautiously, as it enables explicit control of partitions and disks.
Step 1: Launch Diskpart from your compute. Press Windows + R to open Run window where you should type diskpart and click OK. Click Yes button if you are prompted by User Account Control.
Step 2: In the Command Prompt type list volume and press Enter key. Then all partitions on your computer will be listed and each volume is followed with a number. Identify the partition you want to delete and remember the number.
Step 3: Type select volume # and press Enter. Please replace # with the number of the volume to be deleted.
Step 4: Type delete volume and press Enter. Close Command Prompt when you see “DiskPart successfully deleted the selected partition”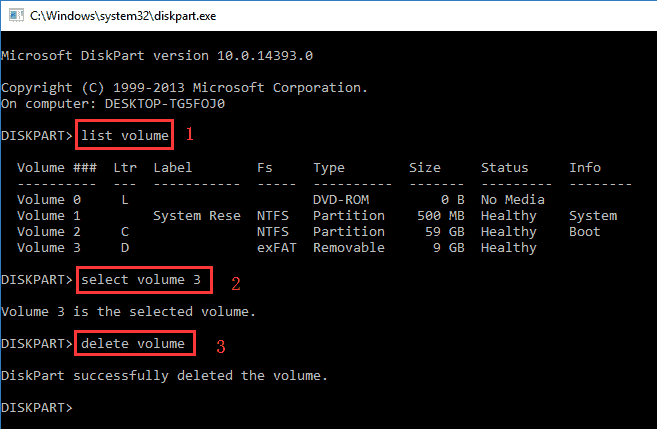
Method 3: Remove one partition on USB disk using a free partition manager
In this solution, we’ll use a free Windows partition manager – DiskGenius Free (formerly known as PartitionGuru) to delete partitions. This tool provides all-inclusive features to manage partitions for various storage devices. As to USB disk partitions, DiskGenius Free (formerly known as PartitionGuru) can do these for you:
- Create, delete, format, and hide partitions on USB drives, SD cards, portable drives, SSDs, etc.
- Resize, split, extend partitions on USB disks as well as add unallocated space to an existing partition without data loss.
- Clone & image a partition for USB drives to help create backup copy.
- Completely wipe data on USB disks to protect sensitive data.
- Check & repair bad sectors on USB flash drives to fix disk damages.
- Partition & repartition USB disks
- Support multiple file system formats: NTFS, FAT32, exFAT, Ext2, Ext3, Ext4, ReFS, etc.
- Recover deleted files and partitions from USB drives. Recover data from corrupted USB drives.
Now we’ll show you how to delete a partition from USB drive using this free partition manager:
Step 1: Insert the USB drive from which you want to delete partition to your computer. Then install and launch DiskGenius Free.
Step 2: Select the partition to be deleted in the software and click the Delete button from toolbar.
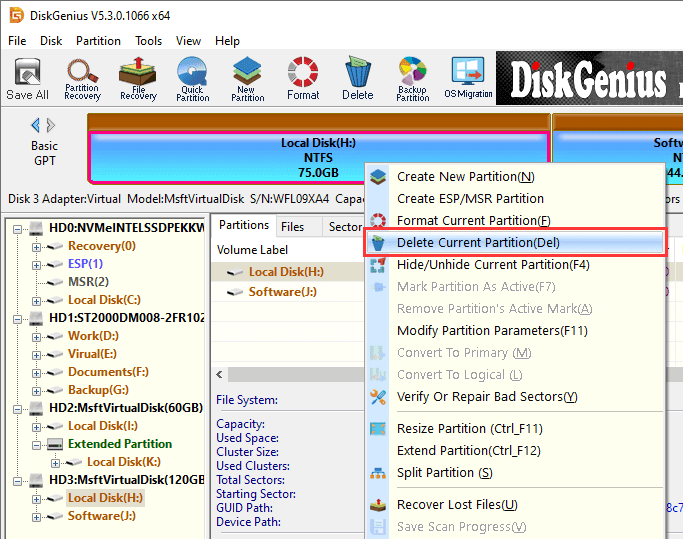
Step 3: Click Yes button when PartitionGuru asks confirmation for the operation.

Step 4: Click “Save All” button to save changes to partition table. Click Yes button and the partition will be deleted successfully.
Method 4: Delete all volumes from a USB drive at one time
This method is able to delete all partitions on a disk at one time, and it is very convenient when there are multiple partitions to be deleted.
Step 1: Launch DiskGenius Free Edition from your computer and locate the USB drive whose partitions need to be deleted.
Step 2: Right-click on the USB drive from the disk directory on the left pane and choose “Delete All Partitions” option.
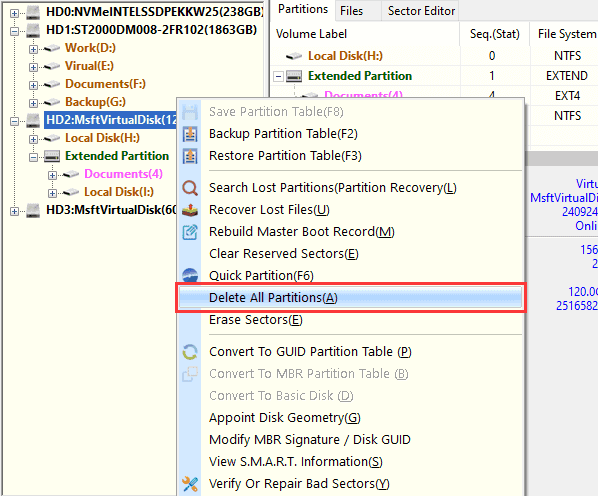
Step 3: Click Yes button when PartitionGuru prompts “Are you sure you want to delete all the partitions on current disk? All files in it will be lost”.

Step 4: Click Save All button to save disk changes to partition table.

How to recover deleted/lost partitions from a USB drive?
This part is written for those who accidentally deleted partitions and lose data. This guide will show you how to search for lost or deleted partitions and restore them to previous status.
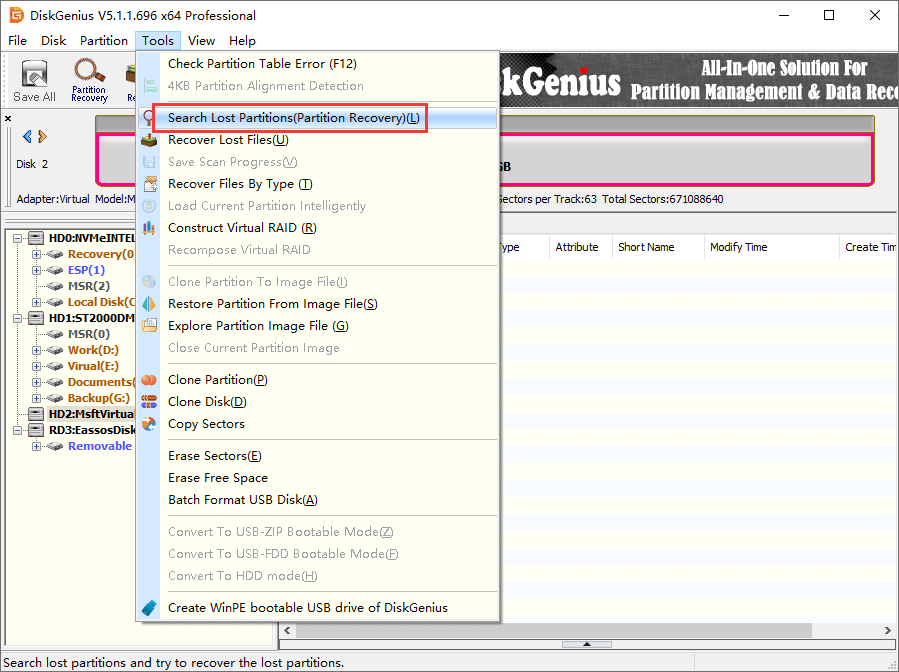
Step 1: Launch DiskGenius (formerly known as PartitionGuru) from your computer. Select the disk where lost partitions were located and click “Search Lost Partition (Partition Recovery)” under Tools menu.
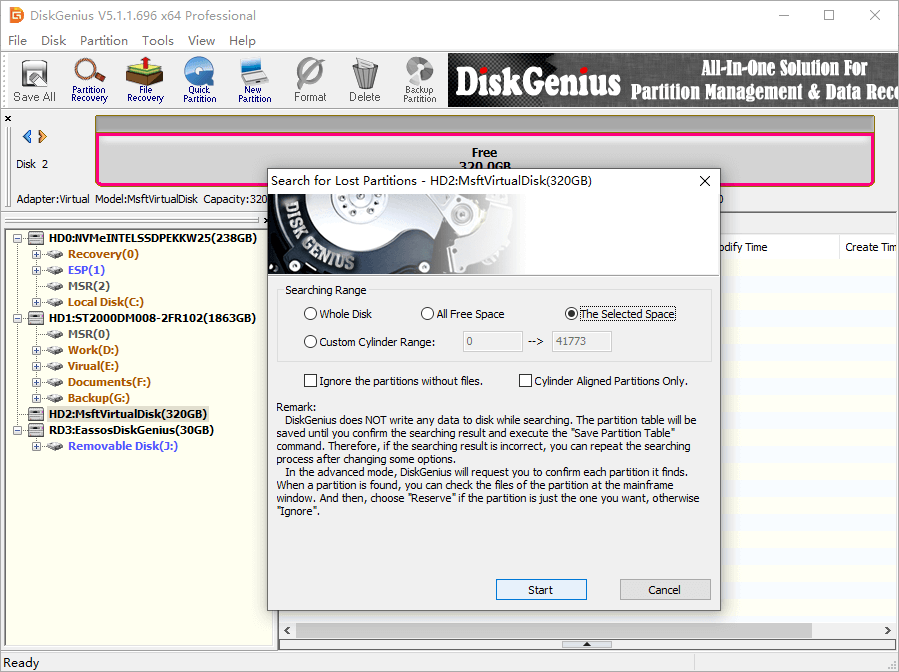
Step 2: Click Start button on the “Search for Lost Partition” window and the software starts to look for lost volumes.
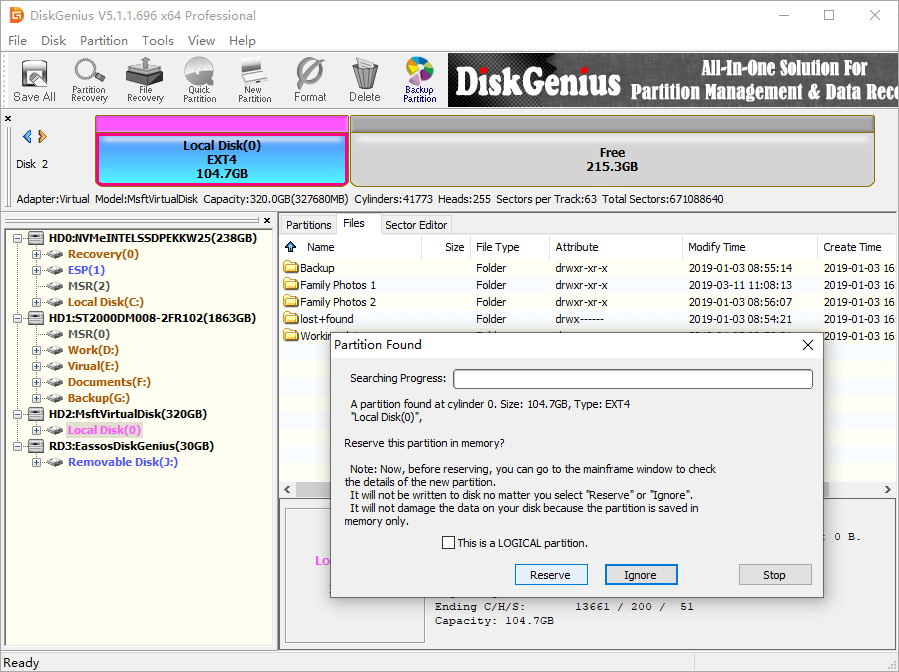
Step 3: Preview files in each partition found by the software and decide whether it is one of your lost partitions.
Select “Reserve” if the partition is correct and click “Ignore” if the partition is not the one you want to restore.
Step 4: Click Save All button to save lost partitions to partition table and get them recovered.
Conclusion
In this instruction, you can find 4 methods to remove partitions from a USB drive, such as delete a partition using Disk Management, Diskpart command, and a free partition manager. Deleting partitions cases data loss, and you should make a backup in advance. Besides, we also present solutions to restore deleted partitions and files in the last part. If you feel this article useful, please feel free to share it with your friends.
